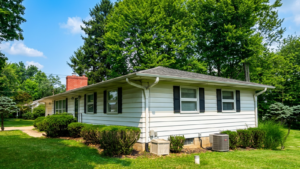
A roof leak fix can be one of the most urgent tasks for any homeowner. If left untreated, a leaking roof can lead to significant damage to your property, including compromised insulation, mold growth, and structural issues. Understanding how to fix a roof leak is essential for maintaining the health and longevity of your roof. In this comprehensive guide, we will walk you through the step-by-step process of identifying, addressing, and preventing roof leaks. By the end, you’ll have the knowledge to handle a roof leak or decide when it’s time to call in professionals.
Identifying the Source of a Roof Leak
Before jumping into a roof leak fix, the first step is to locate the source of the leak. Roof leaks can originate from various points, and identifying the exact location ensures that the repair is efficient and effective.
1. Visual Inspection of the Roof
Start with a thorough visual inspection of your roof. Look for visible signs of damage, such as:
- Missing or damaged shingles
- Cracked tiles
- Dents in metal roofing
- Curling or warping shingles
2. Check Flashing
Flashing is used around chimneys, vents, and other roof penetrations to direct water away from vulnerable areas. Inspect the flashing for any signs of damage, gaps, or rust. Damaged flashing is one of the most common causes of roof leaks.
3. Inspect the Interior
Sometimes, the leak isn’t visible from the outside. Go into your attic or upper floors and look for:
- Water stains on the ceiling or walls
- Mold growth or damp insulation
These signs will help you trace the leak back to its source, allowing you to target the right area for repair.
4. Look for Water Stains
If you notice water stains on the ceilings or walls, it’s a clear indication that water is entering your home. The pattern of the stains may help pinpoint where the leak is coming from.
5. Use a Hose for Testing
If you can’t find the leak visually, perform a water test. Have someone on the roof while you spray water on different sections with a hose. Start low and work your way up, checking for leaks inside the house.
6. Document Your Findings
Take photos and notes of the damage or signs of leaks during your inspection. This documentation will be useful if you decide to hire a professional for repairs.
By identifying the leak’s source, you can move forward with the appropriate roof leak fix.
Preparing for the Roof Leak Fix
Proper preparation is key to performing a successful roof leak fix. It ensures you have everything you need and minimizes the risk of further damage.
1. Gather Necessary Tools and Materials
Before starting the repair, make sure you have the following tools:
- Ladder
- Safety harness
- Hammer
- Roofing nails
- Utility knife
- Roofing cement or sealant
- Replacement shingles (if needed)
- Tarp (for temporary protection)
2. Safety Precautions
Safety is your top priority. Ensure your ladder is stable and placed correctly. Wear non-slip shoes, and consider using a safety harness, especially if you are working on a steep roof. If you’re uncomfortable working at heights, it’s better to hire a professional.
3. Choose the Right Time
Pick a dry, calm day for your roof leak fix. Avoid working in wet or windy conditions, as these can make the process dangerous and ineffective.
4. Prepare the Area
Clear any debris from the roof around the repair site. This will give you a clean work surface and help you assess the damage more clearly.
5. Assess the Damage
Evaluate the extent of the damage. Determine whether it’s a simple fix like replacing a few shingles or if it requires more extensive repairs, such as flashing replacement or structural repairs.
By preparing properly, you set yourself up for a successful and efficient roof leak fix.
Step-by-Step Roof Leak Fix Process

Now that you are ready, let’s dive into the step-by-step process of fixing the roof leak.
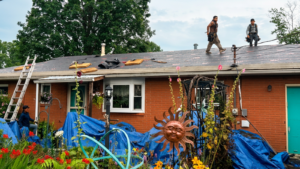
1. Remove Damaged Shingles
If the leak is due to damaged or missing shingles, carefully remove them. Use a utility knife to cut through the sealant holding the shingles down. Be careful not to damage surrounding shingles during this process.
2. Inspect the Underlayment
After removing the damaged shingles, check the underlayment for signs of damage or moisture. If the underlayment is wet or compromised, it may need replacement.
3. Replace the Underlayment (if necessary)
If the underlayment is damaged, cut a new piece to size and lay it down, overlapping the existing sections. Secure it according to the manufacturer’s instructions.
4. Install New Shingles
Place the new shingles over the area, ensuring they align with the existing roof. Use roofing nails to secure them in place, following the manufacturer’s guidelines for proper spacing and placement.
5. Apply Roofing Cement
For added protection, apply roofing cement or sealant around the edges of the new shingles and any exposed nails. This will help create a watertight seal, preventing future leaks.
6. Repair Flashing
If the leak is due to damaged flashing, remove the old flashing and replace it with new material. Ensure that the new flashing integrates seamlessly with the roofing materials, effectively directing water away from vulnerable areas.
7. Check for Additional Issues
After completing the repairs, take a moment to inspect surrounding areas for any other potential issues. Make sure everything is properly sealed and that there are no further signs of damage.
8. Clean Up
Once the repair is complete, clean up your work area. Remove any debris, tools, and materials from the roof to ensure safety and maintain a tidy property.
9. Monitor the Area
After performing the fix, monitor the area for any signs of leaks or water intrusion. If you notice issues, don’t hesitate to consult a professional.
Preventing Future Roof Leaks
Preventing future roof leaks is just as important as addressing the current issue. Here are a few strategies to help you maintain your roof and reduce the risk of future leaks:
1. Regular Inspections
Schedule regular roof inspections, ideally twice a year—in spring and fall—to catch any potential issues before they become significant problems.
2. Routine Maintenance
Perform routine tasks like cleaning gutters, trimming overhanging branches, and removing debris from the roof. Proper maintenance can extend the life of your roof and reduce the likelihood of leaks.
3. Install Gutter Guards
Consider installing gutter guards to prevent debris from accumulating in your gutters. Clogged gutters can lead to water pooling on the roof, increasing the risk of leaks.
4. Ensure Proper Ventilation
Proper attic ventilation is crucial for maintaining a healthy roof. Ensure your attic has sufficient ventilation to regulate temperature and moisture levels, which can help prevent leaks caused by condensation.
5. Choose Quality Materials
When choosing roofing materials, it’s important to follow best practices to ensure durability. For more information on selecting the right materials, check out resources from the National Roofing Contractors Association.
6. Hire Professionals for Major Repairs
For more extensive repairs or new installations, consider hiring a professional roofing contractor. Experienced roofers can handle the job efficiently and ensure that everything is properly sealed.
Why Choose Whitt Roofing & Restoration?
When it comes to roof leak repairs, working with a professional contractor ensures quality and reliability. Here’s why Whitt Roofing & Restoration is the best choice for homeowners in Marengo and Mount Vernon, OH:
Expertise and Experience: With years of experience, we are known for delivering top-notch roof repair services and customer satisfaction.
Comprehensive Services: We offer a wide range of roofing services, from inspections and repairs to full roof replacements.
Quality Materials: We only use high-quality materials to ensure that your roof is built to last and protected from future leaks.
Customer-Centric Approach: We work closely with homeowners to understand their specific needs, providing tailored roofing solutions.
Transparent Pricing: Our pricing is clear and transparent, with no hidden fees, ensuring you get the best value for your investment.
conclusion: Protect Your Home with a Roof Leak Fix
A roof leak can cause significant damage to your home, but with the right knowledge and preparation, you can fix it effectively. By following the steps outlined in this guide, you’ll be well-equipped to address roof leaks and prevent future issues. For homeowners who prefer professional help, Whitt Roofing & Restoration is here to assist with all your roofing needs.
Contact us today for an inspection, or learn more about our comprehensive roofing solutions to ensure your roof remains in excellent condition for years to come!